Why create a new hub?
When an institution would like to join the CAL-ICOR JupyterHub deployment, we create a new hub for them. This is typically done when a new course or department is created, or when a new instructor would like to use the JupyterHub deployment for their course. The new hub will be created in the same GKE cluster as the existing hubs, but will have its own set of resources and configurations. This allows us to manage the resources and configurations for each hub independently, while still benefiting from the shared infrastructure of the GKE cluster.
Prerequisites
Working installs of the following utilities:
The easiest way to install chartpress, cookiecutter and hubploy is to
run pip install -r dev-requirements.txt from the root of the cal-icor-hubs
repo.
Proper access to the following systems:
Google Cloud IAM: owner
Write access to the CaliICOR hubs repo
Owner or admin access to the cal-icor Github organization
Configuring a New Hub
TL;DR
Determine deployment needs, and create a new node pool and/or filestore instance if necessary.
Be sure your gcloud config is set to the cal-icor-hubs gcloud project:
gcloud config set project cal-icor-hubsIf using a custom single-user server image, create the new image and repository.
If needed, create a node placeholder scaler entry (only if a new node pool was created).
Create a new hub deployment configuration file in
cal-icor-hubs/_deploy_configs/.Determine the authentication method and create a new CILogon or Github OAuth application.
Execute the file:
./create_deployment.sh -g <github username> <institution or hubname>. This script automatically:Create the hub’s
stagingandproddirectories in the filestore.Commit and create the PR in
staging.
Review the PR created on GitHub by reviewing the new files
Merge the PR. The Github Action executes the deployment to staging.
Test the staging hub.
Create a PR from
stagingtoprodand mergeCreate the alerts for the
proddeployment of the new hub by executing:./create-alerts.sh <hub-name>
Name the hub
Choose the hub name, which is typically the name of the institution joining our community. It may also include the name of a course or department. This is a permanent name, so be sure to check with the instructor and/or department before proceeding. The name should be all lowercase, and can include letters, numbers, and hyphens. The name should not include any spaces or special characters. The name should be unique within the CAL-ICOR JupyterHub deployment. The name should be short and easy to remember.
Determine deployment needs
Before creating a new hub, have a discussion with the instition rep/instructor about the system requirements, frequency of assignments and how much storage will be required for the course. Typically, there are three general “types” of hub: Heavy usage, general and small courses.
Small courses will usually have one or two assignments per semester, and may only have 20 or fewer users.
General courses have up to ~500 users, but don’t have large amount of data or require upgraded compute resources.
Heavy usage courses can potentially have thousands of users, require upgraded node specs and/or have Terabytes of data each semester.
Both general and heavy usage courses typically have weekly assignments.
Small courses (and some general usage courses) can use either or both of a shared node pool and filestore to save money (Basic HDD filestore instances start at 1T).
This is also a good time to determine if there are any specific software packages/libraries that need to be installed, as well as what language(s) the course will be using. This will determine which image to use, and if we will need to add additional packages to the image build.
Placing this hub on shared resources (node pool and/or filestore)
If you’re going to use an existing node pool and/or filestore instance,
you can skip either or both of the following steps and pick back up at
Authentication and then
Create the hub deployment in the cal-icor-hubs repo.
When creating a new hub with either/both a new node pool and filestore
instance, we also make sure to label these resources with both hub and
<nodepool|filestore>-deployment. 99.999% of the time, the values for
all three of these labels will be <hubname>.
Creating a new node pool
Create the node pool:
gcloud container node-pools create "user-<hubname>-<YYYY-MM-DD>" \
  --labels=hub=<hubname>,nodepool-deployment=<hubname> \
  --node-labels hub.jupyter.org/pool-name=<hubname>-pool \
  --machine-type "n2-highmem-8" \
  --enable-autoscaling --min-nodes "0" --max-nodes "20" \
  --project "cal-icor-hubs" --cluster "spring-2025" \
  --region "us-central1" --node-locations "us-central1-b" \
  --node-taints hub.jupyter.org_dedicated=user:NoSchedule --tags hub-cluster \
  --image-type "COS_CONTAINERD" --disk-type "pd-balanced" --disk-size "200"  \
  --metadata disable-legacy-endpoints=true \
  --scopes "https://www.googleapis.com/auth/devstorage.read_only","https://www.googleapis.com/auth/logging.write","https://www.googleapis.com/auth/monitoring","https://www.googleapis.com/auth/servicecontrol","https://www.googleapis.com/auth/service.management.readonly","https://www.googleapis.com/auth/trace.append" \
  --no-enable-autoupgrade --enable-autorepair \
  --max-surge-upgrade 1 --max-unavailable-upgrade 0 --max-pods-per-node "110"
Creating a new filestore instance
Before you create a new filestore instance, be sure you know the capacity required. The smallest amount you can allocate is 1T, but larger hubs may require more. Confer with the admins and people instructing the course and determine how much they think they will need.
We can easily scale capacity up, but not down.
From the command line, first fill in the instance name
(<filestore-instance-name>-<YYYY-MM-DD>) and <capacity>, and then execute the
following command:
gcloud filestore instances create <filestore-instance-name>-<YYYY-MM-DD> \
  --zone "us-central1-b" --tier="BASIC_HDD" \
  --file-share=capacity=<capacity>,name=shares \
  --network=name=default,connect-mode=DIRECT_PEERING
Your new (but empty) NFS filestore must be seeded with a pair of directories. We run a utility VM for NFS filestore management; follow the steps below to connect to this utility VM, mount your new filestore, and create & configure the required directories.
You can run the following command in gcloud terminal to log in to the NFS utility VM:
gcloud compute ssh nfsserver --zone=us-central1-b --tunnel-through-iapNow, mount the new filestore instance:
mkdir /export/<filestore-instance-name>-filestore
mount <filestore share IP>:/shares /export/<filestore-instance-name>-filestore
Create hub’s staging and prod directories in the filestore
Next, you will need to create the staging and prod directories
inside the filestore instance. This is where the users’ home directories will
be located.
install -d -o 1000 -g 1000 \
  /export/<filestore-instance-name>-filestore/<hubname>/staging \
  /export/<filestore-instance-name>-filestore/<hubname>/prod
Configure filestore security settings and GCP billing labels
If you have created a new filestore instance, you will now need to apply
the ROOT_SQUASH settings. Please ensure that you’ve already
created the hub’s root directory and both staging and prod
directories, otherwise you will lose write access to the share. We also attach
labels to a new filestore instance for tracking individual and full hub costs.
gcloud filestore instances update <filestore-instance-name> --zone=us-central1-b  \
       --update-labels=hub=<hubname>,filestore-deployment=<hubname> \
       --flags-file=<hubname>/config/filestore/squash-flags.json
Authentication
CiLogon Auth
We use CiLogon to manage most authentication for higher education institutions.
You’ll need CILogon credentials if the institution uses Shibboleth, InCommon, Microsoft, or Google as its identity provider. This covers nearly all our use cases. In rare instances, an institution’s IT department might restrict CILogon from providing identity information through Microsoft or Google. If this happens, you can use GitHub OAuth instead; instructions are provided below.
Go to the CILogon Registration page and create a new application.
The page looks like this:
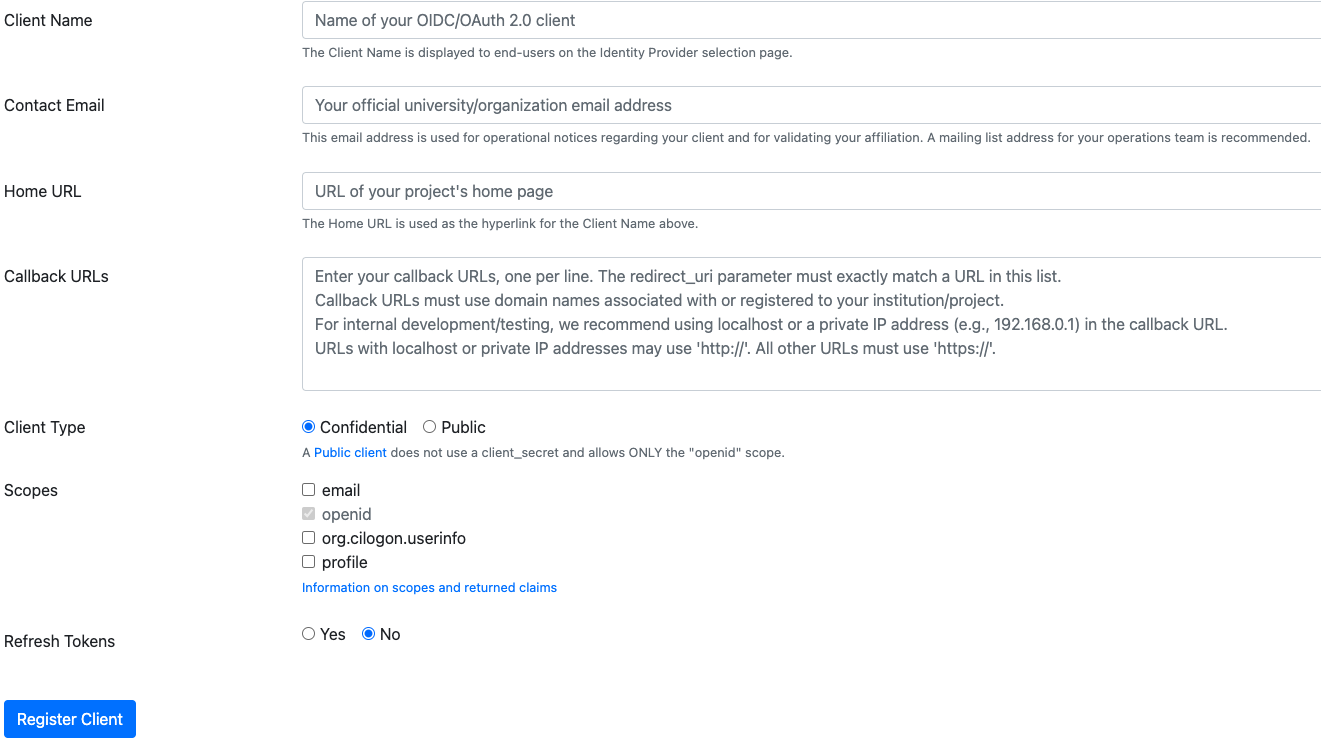
Here is an example, using CSU Long Beach, of how to complete the form for the staging hub:
Client Application: California State University, Long Beach - Staging
Contact Email: cal
-icor -staff@lists .berkeley .edu Home Url: https://<hubname>-staging.jupyter.cal-icor.org
Callback URLs: https://<hubname>-staging.jupyter.cal-icor.org/hub/oauth_callback
Client Type: Confidential
Scopes: email, openid, org.cilogon.userinfo
Refresh Tokens: No
After clicking the “Register Client” button, you are re-directed to a page that contains your
Client ID and Secret; copy both of these to an appropriate place right away. You are going to insert them into the
file _deploy_configs/<hub_name>.yaml you create in this step.
You will need to create two applications for each hub, one for the staging hub and one for the production hub. The example above is for staging. The changes for production are:
Client Application: California State University, Long Beach
Home Url: https://<hubname>.jupyter.cal-icor.org
Callback URLs: https://<hubname>.jupyter.cal-icor.org/hub/oauth_callback
GitHub Auth
Sometimes we can not set up CILogon for a particular institution. The other option is to use Github OAuth.
Create an Github OAuth App at github.com/cal-icor
Click the button:
New OAuth AppComplete the fields for the production OAuth
Application Name: <hubname>-auth
Homepage URL: https://<hubname>.jupyter.cal-icor.org
Application Description: This manages authentication for <hubname>
Authorization callback URL: https://<hubname>.jupyter.cal-icor.org/hub/oauth_callback
Enable Device Flow : Do not check this
Click the green button:
Register Application
You will be given a Client ID and Secret. Copy them into the file
_deploy_configs/<hub_name>.yamlyou create in this step.Create a OAuth App for the staging environment as well. The only changes from above are:
Application Name: <hubname>-staging-auth
Homepage URL: https://<hubname>-staging.jupyter.cal-icor.org
Authorization callback URL: https://<hubname>-staging.jupyter.cal-icor.org/hub/oauth_callback
Create the hub deployment configuration
First, you will need to create a new hub deployment configuration file in
cal-icor-hubs/_deploy_configs/. In that directory, there will be a template
named institution-example.yaml, and you can just cp that and name the new
file <institution or hubnname>.yaml.
Be sure to include the authentication bits that you created via either CILogon or Github OAuth in the configuration file.
Below is an example with comments. Some attributes are left empty or assigned specific values depending on the authentication scheme (CILogon or GitHub). Further, if CILogon is used, these values also vary based on whether the identity provider is Microsoft, Google, or an institution-specific one (via Shibboleth or InCommon).
From the root cal-icor-hubs/ directory, you will run
create_deployment.sh -g <github username> <institution or hubname>. This sets up the hub’s
configuration directory in cal-icor-hubs/deployments/.
Here’s an example for a hub being deployed on the default shared resources:
Deployment Config
$ cat _deploy_configs/newschool.yaml
# This is an example of a configuration file for a JupyterHub deployment.
# This file should be renamed to <name of deployment>.yaml and kept in the
# _deploy_configs directory.
hub_name: newschool
hub_filestore_instance: shared-filestore
hub_filestore_ip: 10.183.114.2
institution: newschool
institution_url: https://example.edu
institution_logo_url: https://example.edu/logo.png
landing_page_branch: main
prod:
  client: asdf
  secret: asdffdsa
staging:
  client: 1324
  secret: 12344312
admin_emails:
  - sknapp@berkeley.edu
  - sean.smorris@berkeley.edu
authenticator_class: cilogon # This is either cilogon or github
authenticator_class_instance: "CILogonOAuthenticator" # This is either "CILogonOAuthenticator" or "GitHubOAuthenticator"
idp_url: http://login.microsoftonline.com/common/oauth2/v2.0/authorize # cilogon only: if github set this to empty string: ""
idp_allowed_domains: # cilogon only: Microsoft or Google Auth Schemes only  e.g, This is an empty string or a yaml list
  - example.edu
  - whee.edu
allow_all: "", # cilogon only: Shibboleth or inCommon auth schemes set allow_all to true; otherwise empty string: ""
allowed_organizations: "" # github only: This is an empty string or a yaml list e.g. - LACC-Statistical-Data-Analytics
Output of deployment script using config above
./create_deployment.sh -g shaneknapp newschool
Creating directories for newschool on filestore.
Switched to a new branch 'add-newschool-deployment'
Created new branch: add-newschool-deployment
Populating deployment config for newschool.
Generating newschool cookiecutter template.
Generating and encrypting secrets for newschool.
Secret file generation and encryption beginning.
Encrypted file saved as: deployments/newschool/secrets/prod.yaml
Deleted file: deployments/newschool/secrets/prod.plain.yaml
Secret file generation and encryption beginning.
Encrypted file saved as: deployments/newschool/secrets/staging.yaml
Deleted file: deployments/newschool/secrets/staging.plain.yaml
Creating repo and github labels for newschool.
Added newschool to the labeler.yml file.
✓ Label "hub: newschool" created in cal-icor/cal-icor-hubs
Created GitHub label for newschool.
Staging new deployment files for newschool.
Adding deployments/newschool/ to staging.
Adding .github/labeler.yml to staging.
Committing changes for newschool with message Add newschool deployment..
yamllint.................................................................Passed
ruff.................................................(no files to check)Skipped
ruff-format..........................................(no files to check)Skipped
pyupgrade............................................(no files to check)Skipped
isort................................................(no files to check)Skipped
black................................................(no files to check)Skipped
flake8...............................................(no files to check)Skipped
Ensure secrets are encrypted with sops...................................Passed
codespell................................................................Passed
fix end of files.........................................................Passed
fix requirements.txt.................................(no files to check)Skipped
check for case conflicts.................................................Passed
check that executables have shebangs.................(no files to check)Skipped
[add-newschool-deployment 51f7d02] Add newschool deployment.
 9 files changed, 274 insertions(+)
 create mode 100644 deployments/newschool/config/common.yaml
 create mode 100644 deployments/newschool/config/filestore/squash-flags.json
 create mode 100644 deployments/newschool/config/prod.yaml
 create mode 100644 deployments/newschool/config/staging.yaml
 create mode 100644 deployments/newschool/hubploy.yaml
 create mode 100644 deployments/newschool/secrets/gke-key.json
 create mode 100644 deployments/newschool/secrets/prod.yaml
 create mode 100644 deployments/newschool/secrets/staging.yaml
Pushing add-newschool-deployment to origin
Enumerating objects: 21, done.
Counting objects: 100% (21/21), done.
Delta compression using up to 24 threads
Compressing objects: 100% (16/16), done.
Writing objects: 100% (17/17), 8.01 KiB | 8.01 MiB/s, done.
Total 17 (delta 5), reused 0 (delta 0), pack-reused 0
remote: Resolving deltas: 100% (5/5), completed with 4 local objects.
remote:
remote: Create a pull request for 'add-newschool-deployment' on GitHub by visiting:
remote:      https://github.com/shaneknapp/cal-icor-hubs/pull/new/add-newschool-deployment
remote:
To github.com:shaneknapp/cal-icor-hubs.git
 * [new branch]      add-newschool-deployment -> add-newschool-deployment
Creating pull request for newschool.
Creating a pull request for newschool on branch add-newschool-deployment
['gh', 'pr', 'new', '-t Add `newschool` deployment.', '-Rcal-icor/cal-icor-hubs', '-Hshaneknapp:add-newschool-deployment', '-Bstaging', '-lhub: newschool', '-b Add `newschool` deployment, brought to you by `create_deployment.py`.']

Creating pull request for shaneknapp:add-newschool-deployment into staging in cal-icor/cal-icor-hubs

https://github.com/cal-icor/cal-icor-hubs/pull/135
If you pass the -m flag to the script, the cookiecutter template will be read
in from your config, and then prompt you to confirm or make changes to the
following information:
<hub_name>: Enter the chosen name of the hub.<institution>: Enter the name of the institution.<instution_url>: Enter the URL of the institution.<institution_logo_url>: Enter the URL of the institution’s logo.<landing_page_branch>: Default ismain, do not change unless the hub requires a different authentication method than CILogon or Github Auth.<project_name>: Default iscal-icor-hubs, do not change.<cluster_name>: Default isspring-2025, do not change.<pool_name>: Name of the node pool (shared or individual) to deploy on.hub_filestore_instance: Defaults toshared-filestore, change if you use a different filestore instance.hub_filestore_ip: Defaults to10.183.114.2, change if you use a different filestore instance.hub_filestore_share: Default isshares, do not change.hub_filestore_capacity: Enter the allocated storage capacity. This is available from the web console.authenticator_class: Default iscilogon, do not change unless the hub requires a different authentication method.authenticator_class_instance: Default isCILogonOAuthenticator, do not change unless the hub requires a different authentication method.idp_url: The endpoint for Google or Microsoft authentication. This is available from the partnered institution.idp: Currently unused?admin_emails: Enter the email addresses of the admins for the hub. This is a comma-separated list.client_id_staging: Enter the client ID for the staging hub. This is available from Cilogon.client_secret_staging: Enter the client secret for the staging hub. This is available from Cilogon.client_id_prod: Enter the client ID for the production hub. This is available from Cilogon.client_secret_prod: Enter the client secret for the production hub. This is available from Cilogon.idp_allowed_domains: Enter the allowed domains for the hub. This is a comma-separated list.
This will generate a directory with the name of the hub you provided with a skeleton configuration and all the necessary secrets.
CI/CD and single-user server image
CI/CD is managed through Github Actions, and the relevant workflows are located
in .github/workflows/. Deploying all hubs are managed via Pull Request
Labels, which are applied automatically on PR creation.
This label will be created automatically when you run
create_deployment.sh, and will look like hub: <hubname>.
The single-user server image is built and pushed to the Google Container Registry
via the build-and-push-image.yaml workflow in the respective image repository.
The definition for this image is located in deployment/<hubname>/config/common.yaml
and looks like this:
jupyterhub:
  # a bunch of hub config here...
  # ...
  singleuser:
    image:
      name: us-central1-docker.pkg.dev/cal-icor-hubs/user-images/base-user-image
      tag: <some hash>
Hubs inheriting an existing single-user server image
If this hub will inherit an existing image, the create_deployment.sh
script will have created common.yaml file in the deployments/<hubname>/config/
directory. This file will have the image tag from an existing deployment which
will contain the latest image hash.
The image specification is found in the cookiecutter template, located here:
cal-icor-hubs/deployments/template/{{cookiecutter.hub_name}}/config/common.yaml
Hubs using a custom single-user server image
If this hub will be using its own image, then follow the
instructions here to create the new image and repository. In this
case, the image tag will be PLACEHOLDER and will be updated AFTER your PR to
cal-icor-hubs is merged.
NOTE: The changes to the cal-icor-hubs repo are required to be merged
BEFORE the new image configuration is pushed to main in the image repo. This
is due to the image building/pushing workflow requiring this deployment’s
common.yaml to be present in the deployments/<hubname>/config subdirectory, as
it updates the image tag.
Create node placeholder scaler entry
If you are deploying to a shared node pool, there is no need to perform this step.
Node pools have a configured minimum size, but our cluster has the ability to set aside additional placeholder nodes. These are nodes that get spun up in anticipation of the pool needing to suddenly grow in size, for example when large classes begin.
Otherwise, you’ll need to add the placeholder settings in
support/values.yaml.
The node placeholder pod should have enough RAM allocated to it that it needs to be kicked out to get even a single user pod on the node - but not so big that it can’t run on a node where other system pods are running! To do this, we’ll find out how much memory is allocatable to pods on that node, then subtract the sum of all non-user pod memory requests and an additional 256Mi of “wiggle room”. This final number will be used to allocate RAM for the node placeholder.
Launch a server on https://hubname.cal-icor.org
Get the node name (it will look something like
gke-spring-2025-user-base-fc70ea5b-67zs):kubectl get nodes | grep *hubname* | awk '{print $1}'Get the total amount of memory allocatable to pods on this node and convert to bytes:
kubectl get node <nodename> -o jsonpath='{.status.allocatable.memory}'Get the total memory used by non-user pods/containers on this node. We explicitly ignore
notebookandpause. Convert to bytes and get the sum:kubectl get -A pod -l 'component!=user-placeholder' \ --field-selector spec.nodeName=<nodename> \ -o jsonpath='{range .items[*].spec.containers[*]}{.name}{"\t"}{.resources.requests.memory}{"\n"}{end}' \ | egrep -v 'pause|notebook'Subtract the second number from the first, and then subtract another 277872640 bytes (256Mi) for “wiggle room”.
Add an entry for the new placeholder node config in
values.yaml:
new-institution:
  nodeSelector:
    hub.jupyter.org/pool-name: new-institution-pool
  resources:
    requests:
      # Some value slightly lower than allocatable RAM on the node pool
      memory: 60929654784
  replicas: 1
For reference, here’s example output from collecting and calculating
the values for data102:
(gcpdev) ➜  ~ kubectl get nodes | grep data102 | awk '{print$1}'
gke-spring-2024-user-data102-2023-01-05-e02d4850-t478
(gcpdev) ➜  ~ kubectl get node gke-spring-2024-user-data102-2023-01-05-e02d4850-t478 -o jsonpath='{.status.allocatable.memory}' # convert to bytes
60055600Ki%
(gcpdev) ➜  ~ kubectl get -A pod -l 'component!=user-placeholder' \
--field-selector spec.nodeName=gke-spring-2024-user-data102-2023-01-05-e02d4850-t478 \
-o jsonpath='{range .items[*].spec.containers[*]}{.name}{"\t"}{.resources.requests.memory}{"\n"}{end}' \
| egrep -v 'pause|notebook' # convert all values to bytes, sum them
calico-node
fluentbit       100Mi
fluentbit-gke   100Mi
gke-metrics-agent       60Mi
ip-masq-agent   16Mi
kube-proxy
prometheus-node-exporter
(gcpdev) ➜  ~ # subtract the sum of the second command's values from the first value, then subtract another 277872640 bytes for wiggle room
(gcpdev) ➜  ~ # in this case:  (60055600Ki - (100Mi + 100Mi + 60Mi + 16Mi)) - 256Mi
(gcpdev) ➜  ~ # (61496934400 - (104857600 + 104857600 + 16777216 + 62914560)) - 277872640 == 60929654784
Besides setting defaults, we can dynamically change the placeholder counts by either adding new, or editing existing, calendar events. This is useful for large courses which can have placeholder nodes set aside for predicatable periods of heavy ramp up.
Commit and deploy to staging
The create_deployment.sh script will have automatically created a new branch
and PR for staging automatically.
Commit and deploy to prod
After your PR to staging is merged, next create a new PR from the staging
branch to the prod branch (https://https://<hub_name>.jupyter.cal-icor.org. Test it out and make
sure things work as you think they should.
Create the alerts for the new hub
Once you’ve deployed the new hub to prod, you must create the uptime alerts
for the hub. From the scripts directory, run the following commands to create
and enable the alerts for the new hub:
./create_alerts.py --create --namespaces <hubname>-prod
./create_alerts.py --enable --namespaces <hubname>-prod